Skip navigation

Monthly Archives: February 2014

So I decided to add a cool feature to the Craigslist Alert app that displays a plot of the number of new posts over time for a given search. This chart allows the user to get an idea of how often and at what time new posts are put up on craigslist for their particular search term, which could help the user refine their search and alert criteria in order to get better results.

Because I was already familiar with matplotlib, I figured I would generate the plots using the library and then save the plot as an image that could then be accessed by the flask app. As I was browsing through the matplotlib docs, I noticed a section on xkcd style plots. This seemed like a fun way to present the data so I set up a test script and gave it a run. As it turns out, in order to get the plot to display correctly, you may need to do a couple of things. First, you need the latest version of matplotlib (1.3), so I had to upgrade my version. Secondly, in order to get the font correct, you need to download the Humor Sans font. Finally, you may have to clear the matplotlib font cache. For linux users you can do this by typing in rm ~/.matplotlib/fontList.cache at the terminal. Once you have all of that set up you simply add plt.xkcd() to your code and you will be rewarded with xkcd style plots. Below is an example of the plots that are generated for the CL App.

Paul3

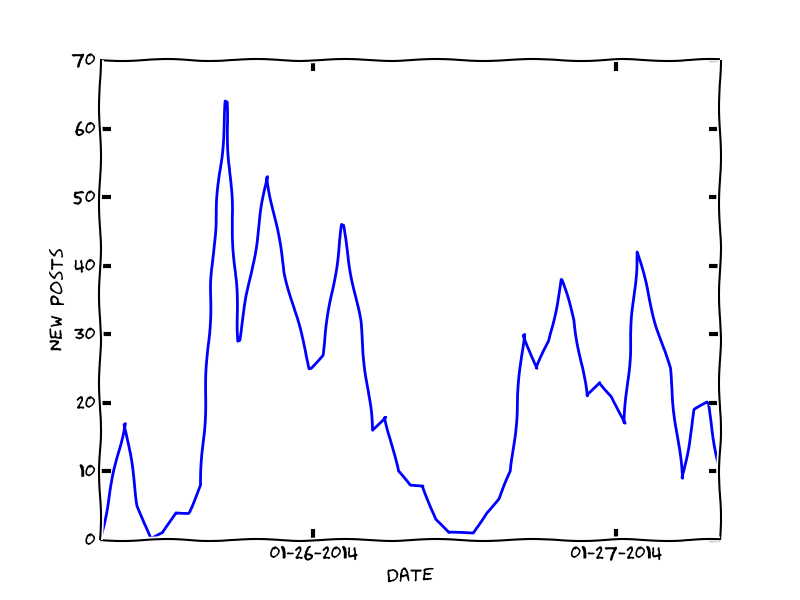
The plots get generated by a function when the viewer loads the alert status page in the web app. The function first checks if the plot exists, and then checks when the last time it was updated. If the plot is more than an hour old, or if it does not already exist, the function will create it and save it to a folder. The file path is returned and put into the html template. Overall, it was a pretty straight forward process. You can check out the code in the github repo (the plot function is in the ‘generate_plots.py’ script).

So my first completed web project is an app that notifies users when a new post appears on a craigslist search. The user can have as many searches as they want, and can receive notifications via email or text message. Here is the link to the app, CLAlerts. The app is pretty bare bones, with a very basic html/css front-end (taken from the flaskr tutorial) and a python/flask/sqlalchemy back-end. The github repo is here. Overtime, I may add a few more features or re-design the app, but at the moment I am just happy to have something that is functional that I can show off.

I was fairly familiar with running a simple flask app thanks to tutorials floating around the web, but this app involved regularly scraping craigslist to check for new posts, which as far as I know, is outside of the capabilities of flask. I have used the linux utility cron to run scraping scripts in the past, and a similar solution seemed appropriate for this app. I wanted to keep things as pyhtonic as possible, so I dug around and turns out there is a scheduler python library called APScheduler. I used the library to run the scraping and message sending tasks for the app. You can check out the final product on github, but below is a sample code snippet.

from apscheduler.scheduler import Scheduler
import time

sched = Scheduler()

@sched.interval_schedule(hours=1)
def run_tasks():
    task1()
    task2()

sched.start()

while True:
    time.sleep(1)
    pass

It’s pretty straight forward. You use the ‘@sched’ decorator to tell APScheduler what functions you want to run. You can define the interval a couple of ways, in this case I am using the interval scheduler, but you can also use a date based or cron style scheduler. The while loop at the end keeps the process running. I read somewhere that using the ‘time.sleep(1)’ line in the while loop stops the process from hogging up CPU resources.

So far this seems to be working. I have launched the app using a micro aws instance. I’ve setup two tmux sessions and have the flask app running in one session and the scheduler running in another. The scheduler runs once an hour and scrapes craigslist and sends out the alerts using the Twilio API for text messages and the python SMTP library for email. So far it seems to be running fairly reliably. At one point, the scheduler appeared to freeze and I had to kill the process and restart the script. I still haven’t figured out what caused it, my only guess is that the script froze up on a database connection error. I am currently using sqlite which can’t handle simultaneous writing, but at the moment, I don’t have a way to test this theory. If I find the time, I might try and set up a test for this. I’ll make sure to write a post about it if I do.

As I mentioned in my previous post, I was struggling to get the Flask login manager and the sqlalchemy ORM to work together, so once I got it working, I felt it would be a good idea to create a separate github repository with template code so that I don’t have to repeat the process again. It turns out that flask has it’s own sqlalchemy extension that abstracts away a lot of the sqlalchemy setup and integration. Unfortunately, I was not made aware of this until after I finished the template. Regardless, I got the login manager working without the flask-sqlalchemy extension, and it turns out I prefer the syntax of this method anyway, so I am sticking with it.

The github repo for the login template is here. The readme contains the installation and setup instructions for linux users. Once the flask server is up and running you should be able to view the app through a local web browser.

One of the big benefits of using the flask login manager (as opposed to dealing with authentication yourself) is that it is now very simple to require authentication to your various views in your app. Here is some example code on setting up a view that requires authentication:

@app.route("/example_page")
@login_required
def example_page():
    message1 = "Hello, " + current_user.name
    message2 = "Here is your example page"
    return render_template("example_page.html", message1=message1, message2=message2)

Simply adding the ‘@login_rquired’ decorator is all that is required to ensure that the page can only be viewed by authenticated users. Additionally, you can access the logged in user through the global current_user object.

Some additional benefits of the flask login manager is it will handle cookie management and “remember me” functionality. It should be noted that this template is pretty bare bones. Outside of getting the flask login manager setup with a sqlalchemy database and some simple html pages, there really isn’t much else there. So there you go, let me know if you have any questions.